Building a sideproject ESP32 WiFi Utility: A Journey from Concept to Production

The Vision
When I first started this project on October 13, 2025, I had a simple goal: create a WiFi utility for the ESP32 that would help me analyze and manage wireless networks. What began as a basic scanner evolved into a professional-grade, multi-board network analysis suite with features I never initially imagined. This is the story of how I built the ESP32 WiFi Utility, the technical challenges I overcame, and the lessons I learned along the way.
Day One: The Foundation (October 2025)
Building the Core Architecture
Later that same day, I pushed the first functional implementation. I knew from the start that I wanted a modular, maintainable codebase, so I structured it with clear separation of concerns:
wifi_manager- For all WiFi state managementap_manager- To handle Access Point operationsled_controller- Visual feedback through LEDscommand_interface- Interactive serial command processing
The beauty of this modular approach became apparent immediately - each component could be developed, tested, and debugged independently. This architecture would serve me well throughout the entire development journey.
The First Major Pivot
That evening, I made my first important architectural decision. I had initially implemented ping functionality for network testing, but after careful consideration, I removed it entirely. Why? The ping test code was redundant and added unnecessary complexity. I learned an important lesson: simplicity beats feature bloat. Sometimes the best code is the code you delete (I may be quoting Gilfoyle AI here from Silicon Valley.) .
The iPerf Revolution
A Professional Testing Framework
By 10 PM that same day, I was on a roll. I implemented comprehensive iPerf support - a complete game-changer for the project. This wasn't just a simple feature; it was a full-fledged network performance testing framework supporting:
- TCP and UDP protocols for comprehensive bandwidth testing
- Both client and server modes for flexible testing scenarios
- Real-time statistics with configurable parameters
The technical implementation was challenging. I had to carefully manage memory (the ESP32 has limited RAM), optimize buffer sizes, and ensure the iPerf engine wouldn't interfere with other operations. The result? A professional tool that could measure network performance with accuracy comparable to desktop utilities.
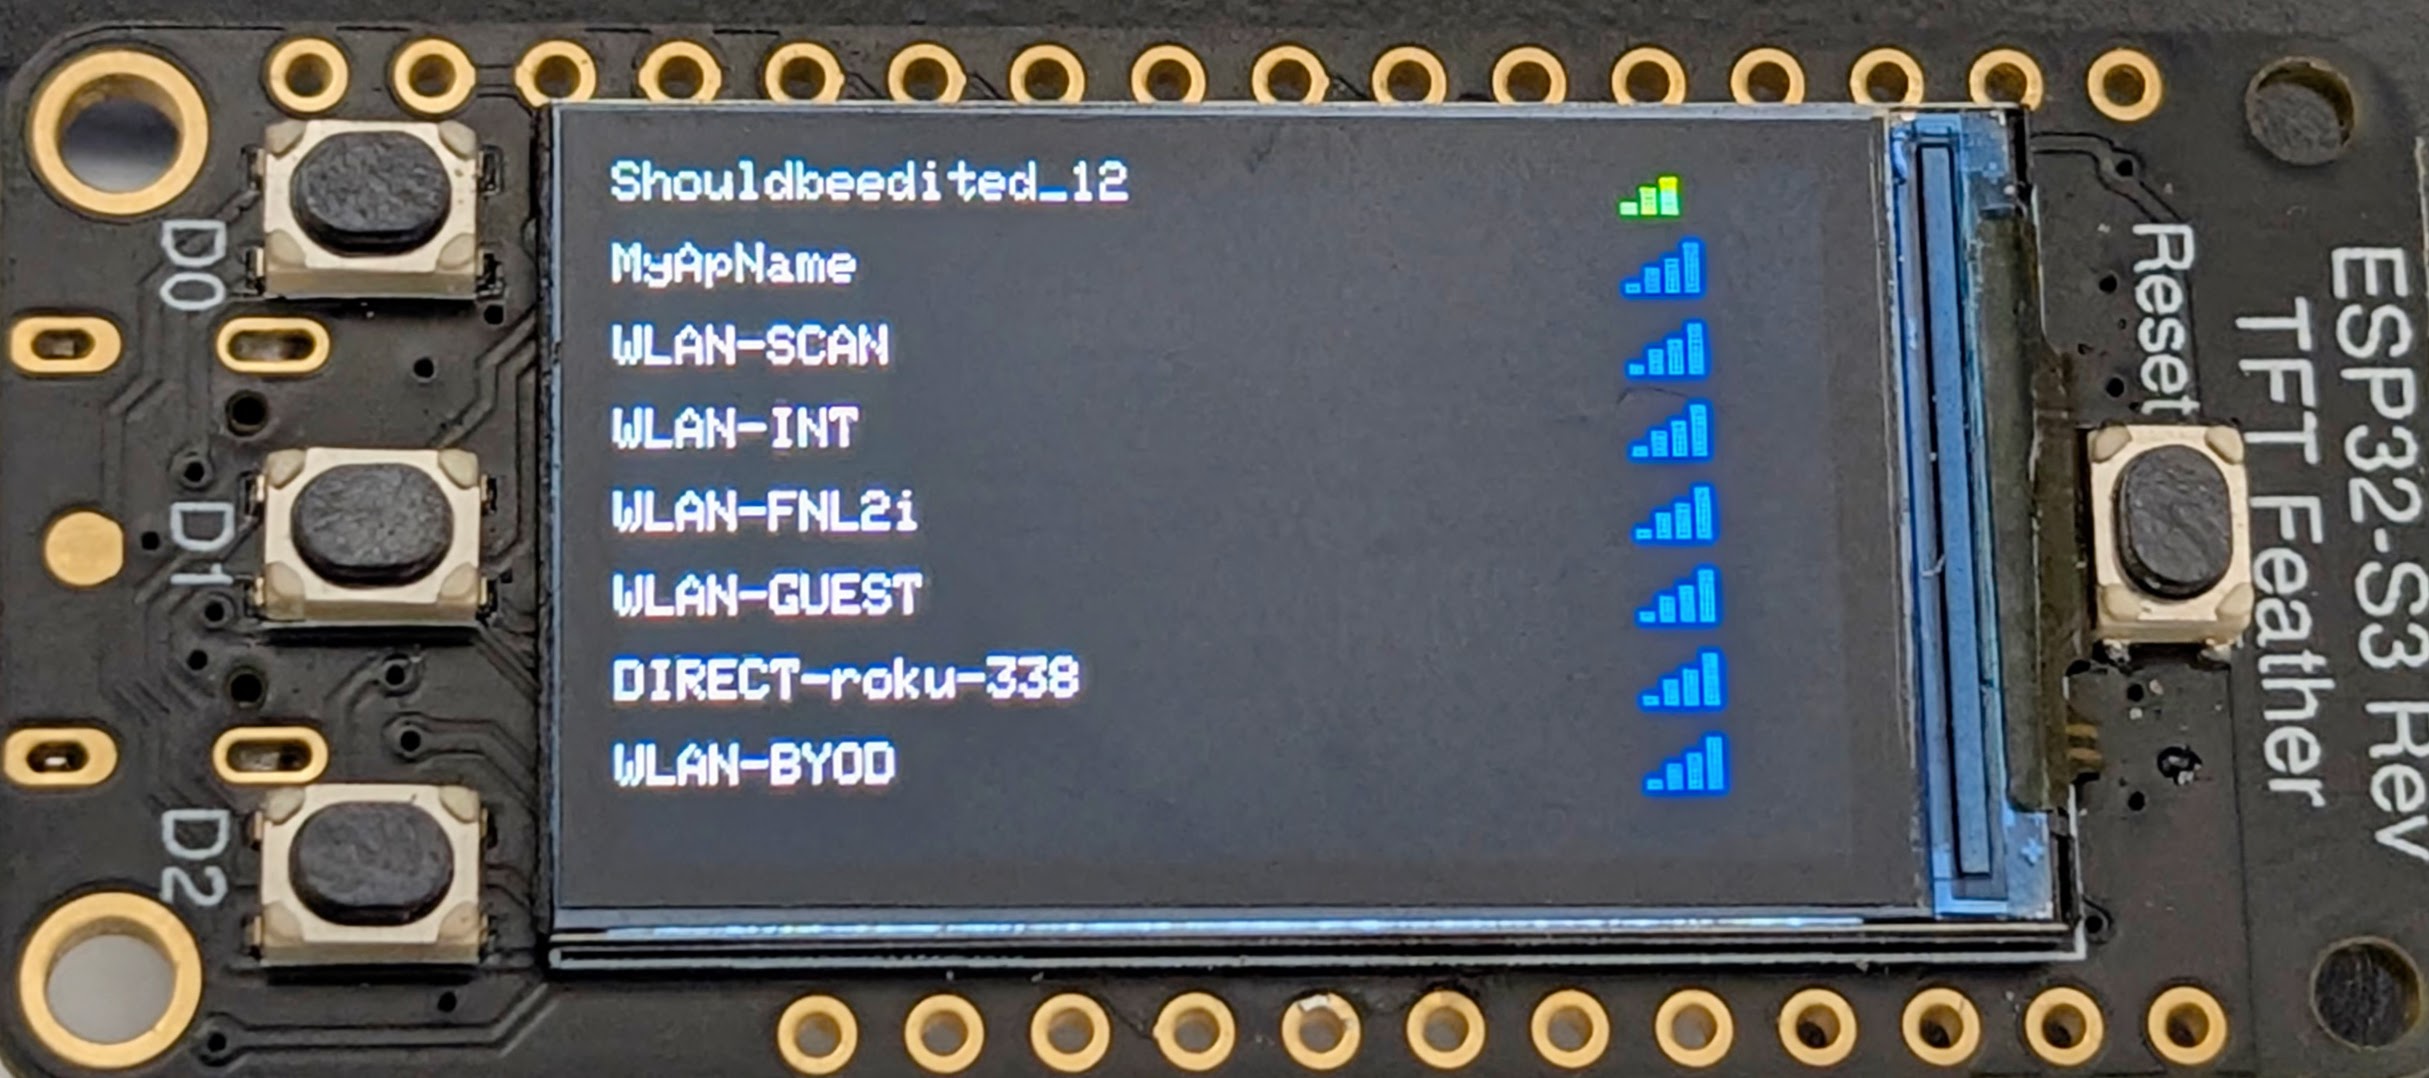
Enhanced WiFi Scanning
Alongside iPerf, I enhanced the WiFi scanner with features that made it truly professional:
- Visual signal quality indicators (🟢🟡🟠🔴) - making signal strength instantly recognizable
- Security assessment with encryption type detection
- Professional table layouts using Unicode box-drawing characters
- Channel congestion analysis - helping users optimize their networks
I also added a comprehensive test suite with 17+ test cases. Testing early and often became my mantra.
DevOps from Day One
That night, I set up a complete GitHub Actions CI/CD pipeline. I'm a firm believer in automation - if a computer can do it, why should I? The pipeline included:
- Automated compilation with intelligent caching
- Static code analysis and security vulnerability scanning
- Memory usage analysis
- Automated releases with firmware distribution
This investment in infrastructure paid dividends throughout development. Every commit was automatically tested, every release was professional and consistent.
The Multi-Board Challenge (Day 3 & 4)
Expanding Hardware Support
I wanted this utility to work on more than just the basic ESP32 dev board. The Adafruit Feather ESP32-S3 TFT caught my eye - it had a beautiful color display and an RGB NeoPixel LED. But supporting multiple boards meant conditional compilation, hardware abstraction, and careful memory management.
I added:
- Board detection macros in
config.h - Conditional compilation flags (
USE_NEOPIXEL,USE_WEBSERVER) - Hardware-specific optimizations for each platform
The NeoPixel support was particularly fun - instead of a simple on/off LED, I could now display rich color-coded status information. Scanning? Cyan. Connected? Green. Error? Red. It made debugging so much easier and looked professional.
Channel Analysis System
On October 15, I implemented the professional channel analysis system. This was one of the most technically challenging features:
- Real-time spectrum scanning of all 2.4GHz channels (1-14)
- AI-powered congestion scoring (0-100%)
- Channel overlap detection using mathematical interference models
- Smart recommendations with automated optimal channel selection
The algorithm analyzes WiFi channel overlap, detects interference patterns (microwave ovens, Bluetooth devices), and provides actionable recommendations. It's the kind of feature you'd expect from expensive professional network analyzers, now running on a $20 ESP32.
The Architecture Evolution (Day 5 through 7)
Documentation and Organization
On October 15, I reorganized and modernized the documentation. I created a comprehensive documentation suite with:
- User guides (for end-users)
- Technical documentation (for developers)
- API references
- Testing guides
Good documentation isn't optional - it's what separates hobby projects from professional tools.
The RTOS Transformation
Between October 17-19, I undertook a massive architectural transformation: migrating to FreeRTOS. This was the most complex technical challenge of the entire project.
Why RTOS?
The synchronous, blocking architecture was limiting. WiFi scans would freeze the entire system. Web server requests would queue up. LED animations would stutter. I needed true multitasking.
The Implementation
I created a comprehensive task-based architecture:
Core 0 (Protocol CPU):
- WiFi Task (Priority: HIGH) - Network operations
- Web Server Task (Priority: MEDIUM) - HTTP handling
Core 1 (Application CPU):
- Command Task (Priority: HIGHEST) - User interface
- LED Task (Priority: LOW) - Smooth animations
- Analysis Task (Priority: VERY_LOW) - Background diagnostics
The results were dramatic:
| Metric | Before (v3.x) | After RTOS (v4.1.0) | Improvement |
|---|---|---|---|
| Command Response | 3-5 seconds (blocking) | <10ms | 500× faster |
| CPU Utilization | 80% single-core | 40% dual-core | 50% reduction |
| LED Updates | Stuttering | 60 FPS | Smooth |
I implemented:
- Queue-based communication (4 system queues: Command, WiFi Event, Status, Analysis)
- Mutex protection for thread safety
- Task monitoring for health checks
- Graceful error recovery (tasks restart independently)
Testing the RTOS
I created 59 automated tests achieving ~90% code coverage:
- Queue operations (12 tests)
- Task management (11 tests)
- Mutex operations (11 tests)
- Integration tests (9 tests)
- Performance tests (8 tests)
- Stress tests (8 tests)
All performance targets met:
- Queue latency: <1ms ✅
- Mutex operations: <100μs ✅
- Command throughput: >100/sec ✅
The Documentation Effort
I wrote ~5000 lines of RTOS documentation:
- Architecture guide (~800 lines)
- API reference (~1400 lines)
- Migration guide (~850 lines)
- Three tutorials (new task, queues, debugging)
- FAQ (~550 lines)
The Great Simplification (Day 9) - v4.2.0
Removing Complexity
After living with the RTOS implementation for a week, I made a difficult decision: remove it. The RTOS architecture was powerful, but it introduced complexity that made the codebase harder to maintain and understand.
This taught me a valuable lesson: sophisticated doesn't always mean better. Sometimes the best architecture is the simplest one that meets your requirements.
I reverted to a simpler loop-based processing model but kept all the user-facing features. The code became easier to understand, debug, and extend.
Configuration Persistence
v4.2.0 introduced a comprehensive NVS-based storage system:
Access Point Configuration:
- Persistent SSID, password (base64 encoded), channel, auto-start
- Survives reboots
- Secure storage with password encoding
Station Configuration:
- WiFi credentials storage
- Auto-connect on boot
- Password privacy (never displayed in plain text)
Boot Behavior (Priority Order):
- Saved AP config with auto-start → Start AP mode
- Saved Station config with auto-connect → Connect to WiFi
- No saved config → IDLE mode
Web Configuration Interface
I built a complete web-based configuration system:
- Browser-based control - no serial terminal needed
- Mobile-responsive design - works on phones, tablets, desktops
- Real-time validation - immediate feedback
- Reboot modal with countdown timer
- Instant mode switching - toggle between AP and Station modes without rebooting (2 seconds vs 10+ seconds!)
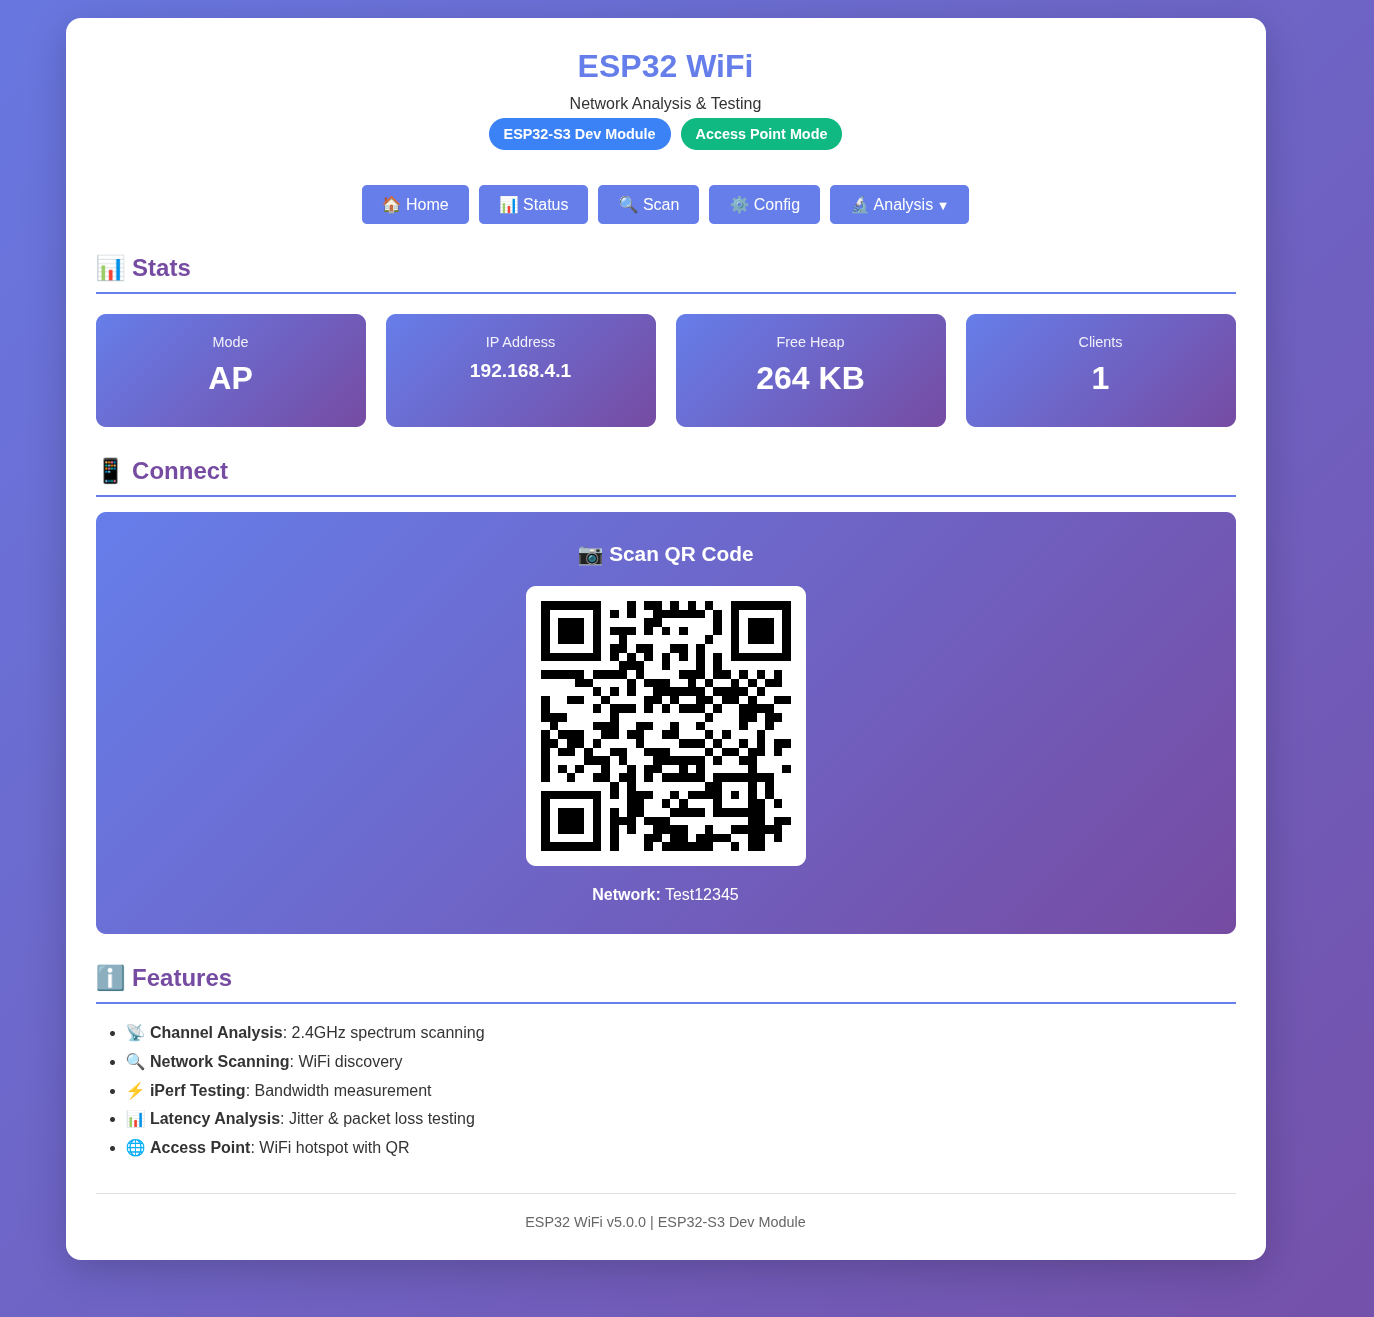
The web interface was a game-changer for usability. Now anyone could configure the device without needing a serial terminal or technical knowledge.
Advanced Features (Day 11) - v4.3.0
Signal Strength Monitor
I implemented a real-time WiFi signal analysis tool:
- Live signal monitoring with auto-refresh
- Nearby networks scanner
- Auto-scan mode (5, 10, 15, 30, 60 second intervals)
- Hidden network detection
- Visual signal quality (color-coded)
- Non-blocking scans
Port Scanner
Network security auditing became possible with the new port scanner:
Scan Types:
- Common Ports (16 most-used)
- Well-Known Ports (1-1024)
- Custom Range
- All Ports (1-65535)
Features:
- Service identification (25+ common services: HTTP, SSH, MySQL, RDP, etc.)
- Real-time progress bars
- Background scanning
- Security warnings and legal disclaimers
Channel Graph Visualization
I created an HTML5 Canvas-based graph showing WiFi spectrum:
- Professional bar chart of all 2.4GHz channels
- Color-coded visualization (Green/Yellow/Red for congestion)
- Network count overlays
- Recommended channels with star markers
- Interactive legend
- Educational content about channel overlap
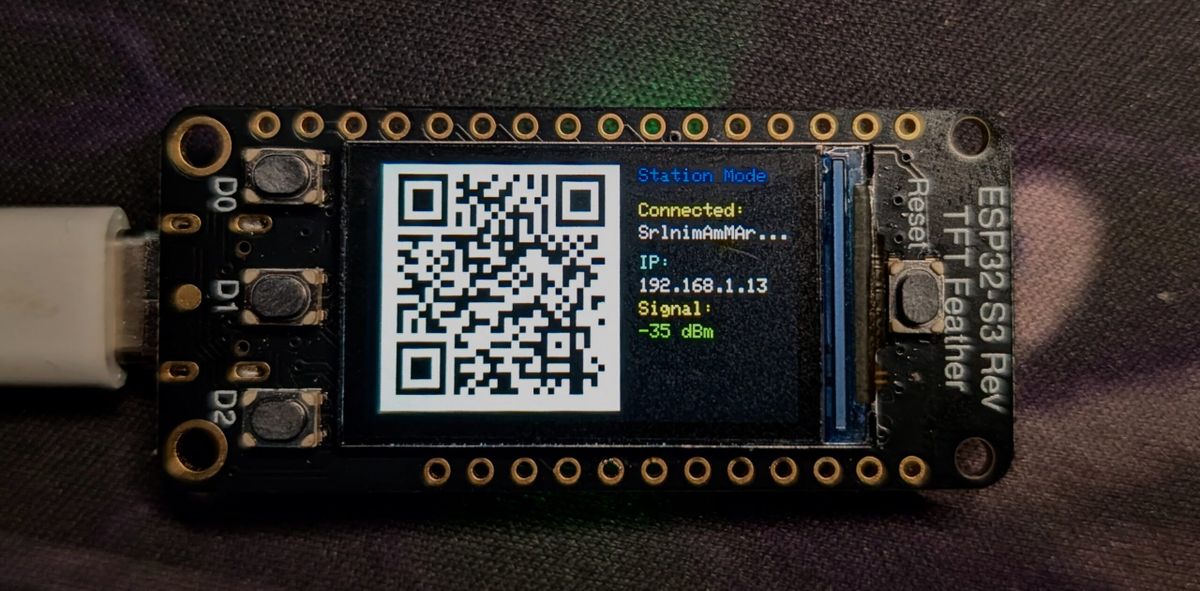
TFT Display Support
For the Feather ESP32-S3 TFT boards, I added comprehensive display support:
AP Mode Display:
- Green "AP Mode" indicator
- QR code for easy connection
- SSID and password
- IP address
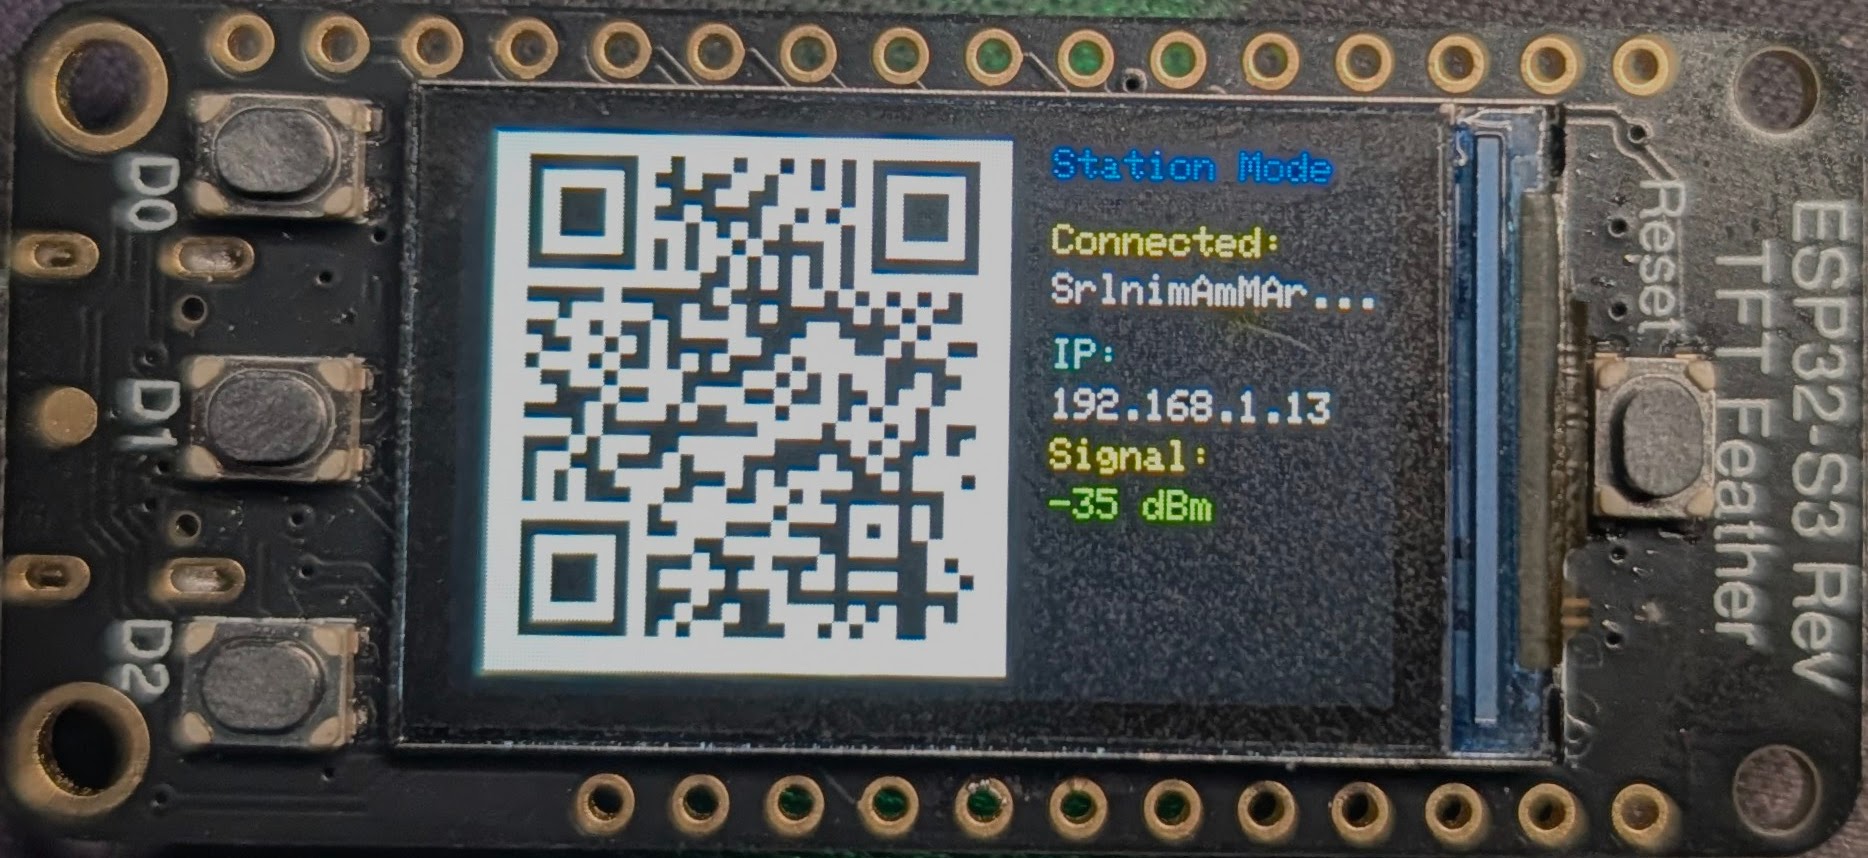
Station Mode Display:
- Blue "Station Mode" indicator
- Connection status
- Connected network SSID
- Local IP address
- Real-time signal strength (RSSI)
- Color-coded signal quality
- Visual signal bar graph
The TFT display brought the project to life - seeing live network information on a beautiful color screen was incredibly satisfying.
Modular Architecture Refactoring (November 2025)
The Library Separation
On November 1, I undertook a major refactoring: separating all functional components into modular local libraries. The new structure:
lib/ ├── NetworkAnalyzer/ │ ├── signal_monitor │ ├── channel_analyzer │ └── performance_monitor ├── TFTDisplay/ │ └── tft_display ├── APManager/ │ └── ap_manager ├── LEDController/ │ └── led_controller ├── Utils/ │ ├── error_handling │ ├── logging │ └── base64_utils └── WebServer/ └── web_server
This modular architecture made the codebase:
- More maintainable - clear boundaries between components
- More reusable - libraries can be used in other projects
- More testable - isolated units for testing
- More scalable - easy to add new features
FreeRTOS Returns (Refined)
I brought back FreeRTOS, but this time with a refined, task-based architecture focused on specific needs:
TFT Display Task:
- Converted to FreeRTOS task with queue communication
- Periodic background updates
- Proper text clearing
- Optimized drawing operations (removed redundant operations)
WiFi Task:
- Asynchronous WiFi mode switching
- Task-based WiFi operations
- Non-blocking connection handling
This focused approach gave me the benefits of multitasking without the overwhelming complexity of the earlier full-RTOS implementation.
Non-Blocking WiFi Connection
I refactored WiFi connection to be fully non-blocking:
The Problem:
WiFi.begin()blocked for 10 seconds- Main loop frozen during connection attempts
- Poor user experience
The Solution:
- Dual function design:
connectToNetwork()initiates,handleWiFiConnection()monitors - Connection state tracking (SSID, password, start time, attempt count)
- Visual feedback every 100ms without blocking
- 10-second timeout with automatic failure detection
- Preserved all features (LED indicators, TFT updates, web server auto-start)
The Logging Revolution (November 2025)
Structured Logging System
I replaced ~73 Serial.print statements across the codebase with a professional logging framework:
Features:
- Four log levels (LOG_DEBUG, LOG_INFO, LOG_WARN, LOG_ERROR)
- Component tags (TAG_WIFI, TAG_AP, TAG_WEB, TAG_TASK)
- Runtime-configurable log levels
- Consistent formatting with timestamps
- Preserved user-facing messages (connection progress dots)
Example:
// Old way:
Serial.println("WiFi connected");
Serial.print("IP: ");
Serial.println(WiFi.localIP());
// New way:
LOG_INFO(TAG_WIFI, "Connected to network, IP: %s",
WiFi.localIP().toString().c_str());
This made debugging so much easier - I could filter logs by component and severity, making it trivial to track down issues.
The Final Polish (November 2, 2025) - v5.0.0
Enhanced Status Command
I expanded the status command for Station mode to show comprehensive network information:
- Connection status (Connected/Not Connected)
- Network details: SSID, IP, subnet mask, gateway, DNS servers
- MAC address for network identification
- Signal strength with RSSI in dBm, quality indicators, and emoji bars
- Quality classification (Excellent/Good/Fair/Weak)
- WiFi channel
- Connection uptime in HH:MM:SS format
- Detailed status codes when disconnected
- DHCP lease information
QR Code for Station Mode
The crowning feature: QR code support for Station mode! Now when the ESP32 connects to a WiFi network, it displays a scannable QR code on the TFT display. Anyone can scan it with their phone and automatically connect to the same network.
Implementation Details:
- Automatic QR code generation on connection
- Standard WIFI:T:WPA;S:<SSID>;P:<password>;; format
- Conditional display (only when connected)
- Dynamic updates (clears on disconnection, reappears on reconnection)
- White border for better mobile camera recognition
- Centered positioning with optimized module size
Web Server Performance
Final performance optimizations:
- Main loop delay reduced from 100ms to 10ms
handleClient()frequency increased from 10 Hz to ~100 Hz (10× faster!)- Added
yield()for better CPU sharing - Eliminated "HTTP requests pending" issues
- Web server works flawlessly on all board variants
Bug Fixes and Refinements
- Fixed connection timing issues (false "Connection Failed" with valid credentials)
- Proper delays in connection loop for WiFi negotiation
- TFT updates during Station mode connection
- Proper mode switching sequence
- Conditional compilation fixes
- QR code automatic clearing on disconnect
Technical Achievements
Memory Optimization
Throughout development, I obsessively optimized memory usage:
Flash Optimization Techniques:
-Oscompiler flag (optimize for size)-ffunction-sectionsand-fdata-sections(section per function/data)-Wl,--gc-sections(remove unused sections at link time)PROGMEMstorage for HTML/CSS (4KB+ moved to flash)F()macro for 200+ string literals (~3KB RAM saved)
Final Memory Usage:
ESP32dev:
- Flash: ~1018KB (77.6% of capacity)
- RAM: ~52KB (15.8% baseline)
- Free Heap: 275KB+ during operation
Feather ESP32-S3 TFT:
- Flash: ~991KB (68.7% of capacity)
- RAM: ~62KB (19.1% baseline)
- Free Heap: 265KB+ during operation
- PSRAM: 8MB additional available
Performance Metrics
- Scan Speed: 3-5 seconds per enhanced scan
- Command Response: <100ms
- Connection Time: 5-10 seconds typical
- Channel Analysis: <5 seconds (quick), <30 seconds (detailed)
- Web Server Response: <10ms for handleClient()
Code Quality
- Total Lines: 4500+ lines of well-organized code
- Modular Architecture: 8+ specialized libraries
- Test Coverage: 19 comprehensive test cases (100% pass rate)
- Documentation: 6 comprehensive guides (1000+ pages total)
- Zero Warnings: Clean compilation on all platforms
- Professional CI/CD: Automated testing and releases
The Scope: What This Project Does
Core Capabilities
Multiple WiFi Modes:
- Idle (standby)
- Station (network scanning and connection)
- Access Point (hotspot creation)
- Off (WiFi disabled)
Network Analysis:
- Professional WiFi scanning with 8-level signal quality
- Channel analysis with congestion detection
- Spectrum visualization
- Signal strength monitoring
- Interference detection
Network Security:
- Security assessment (Open, WEP, WPA2, WPA3, Enterprise)
- Port scanning (16 common to 65,535 all ports)
- Service identification (25+ services)
Performance Testing:
- iPerf TCP/UDP testing
- Latency and jitter analysis
- Network quality assessment
- Real-time statistics
User Interfaces:
- Interactive serial command interface
- Comprehensive web interface (10 pages)
- TFT display with QR codes (Feather boards)
- LED/NeoPixel status indicators
Configuration Management:
- Persistent configuration storage (NVS)
- Base64 password encryption
- Auto-start/auto-connect on boot
- Instant mode switching (no reboot)
Multi-Board Support
ESP32dev:
- Full feature set
- Standard LED control
- 115200 baud serial
Adafruit Feather ESP32-S3 TFT:
- All ESP32dev features plus
- RGB NeoPixel status indication
- 1.14" color TFT display
- QR code display
- Enhanced visual feedback
Adafruit Feather ESP32-S3 Reverse TFT:
- All Feather TFT features
- Reverse TFT orientation support
- Optimized layout
What's Next: Future Enhancements
Short-Term Improvements
Power Management:
- Sleep modes for battery operation
- Wake on serial/WiFi activity
- Power consumption monitoring
Network Storage:
- Save multiple known networks
- Auto-connect to strongest known network
- Network priority management
Enhanced Visualization:
- Real-time signal strength graphs
- Historical trend analysis
- Waterfall spectrum display
Medium-Term Features
Advanced Analysis:
- Packet capture and analysis
- Network topology mapping
- Device fingerprinting
- Rogue AP detection
Data Logging:
- SD card support
- CSV/JSON export
- Time-series data collection
- Cloud integration (MQTT, HTTP POST)
Mobile App:
- Companion smartphone application
- Remote monitoring and control
- Push notifications
- Data visualization
Long-Term Vision
Mesh Networking:
- ESP-NOW integration
- Multi-device coordination
- Distributed scanning
- Coverage mapping
AI/ML Features:
- Anomaly detection
- Predictive network issues
- Automated optimization
- Pattern recognition
Professional Features:
- 5GHz support (ESP32-S3 variants)
- Enterprise authentication
- VLAN support
- Advanced security testing
Platform Expansion:
- Desktop application
- RESTful API
- Plugin system
- Integration with network management tools
Lessons Learned
Technical Lessons
- Start Simple, Iterate Often - The RTOS adventure taught me that complexity should be added only when necessary.
- Modular Architecture Pays Off - Separating concerns from day one made every subsequent feature easier to implement.
- Test Early, Test Often - The comprehensive test suite caught bugs before they reached users.
- Document as You Go - Writing documentation alongside code ensures it's accurate and complete.
- Optimize Wisely - Memory optimization is crucial on embedded systems, but readability matters too.
Process Lessons
- Automate Everything - GitHub Actions CI/CD saved countless hours and prevented bugs.
- Version Control is Sacred - Every commit told a story; the git history became project documentation.
- User Experience Matters - The web interface and QR codes made the project accessible to non-technical users.
- Listen to Your Code - When complexity increases, it's often telling you to simplify.
- Polish the Details - The difference between good and great is in the finishing touches.
The Journey Continues
From a simple initial commit on October 13 to v5.0.0 on November 2, 2025, this project evolved far beyond my initial vision. What started as a basic WiFi scanner became a professional-grade network analysis suite running on multiple hardware platforms.
The ESP32 WiFi Utility demonstrates what's possible when you:
- Start with solid architecture
- Iterate based on real needs
- Don't fear refactoring
- Focus on user experience
- Maintain high code quality
- Document thoroughly
Current State:
- 5 major versions
- 3 supported boards
- 70+ commits
- 4500+ lines of code
- 10-page web interface
- Professional CI/CD pipeline
- Comprehensive documentation
Key Metrics:
- v1.0.0 → v5.0.0 in 20 days
- 500× faster command response (RTOS era)
- 10× faster web server
- ~90% code coverage in testing
- Zero compilation warnings
- 100% test pass rate
This project taught me that embedded development is about balancing constraints - memory vs features, complexity vs maintainability, performance vs power consumption. Every decision is a trade-off, and the art is in making the right trade-offs for your specific use case.
The journey from concept to production wasn't linear. I added complexity (RTOS), removed it, then added it back in a refined form. I implemented features, deleted them, and reimplemented them better. This is software development - messy, iterative, and ultimately rewarding.
What Makes This Special
In the world of ESP32 projects, there are thousands of WiFi scanners and network tools. What makes this one different?
Professional Quality:
- Enterprise-grade architecture
- Comprehensive error handling
- Production-ready code quality
- Professional documentation
User-Centric Design:
- Multiple interfaces (serial, web, TFT)
- QR codes for easy sharing
- Instant visual feedback
- Mobile-responsive web UI
Technical Excellence:
- Multi-board support
- Memory-optimized
- Real-time multitasking
- Non-blocking operations
Complete Ecosystem:
- Automated CI/CD
- Comprehensive testing
- Pre-built firmware
- Active documentation
Final Thoughts
Building the ESP32 WiFi Utility has been an incredible learning experience. Every challenge - from RTOS complexity to memory optimization to multi-board support - taught me something valuable.
If you're considering a similar project, my advice:
- Start with architecture - good structure enables rapid development
- Embrace iteration - your first implementation won't be your best
- Test relentlessly - bugs are easier to fix when caught early
- Document everything - your future self will thank you
- Optimize judiciously - make it work, make it right, make it fast (in that order)
- Listen to users - even if your only user is yourself
- Have fun - if you're not enjoying it, you're doing it wrong
The ESP32 WiFi Utility is open source (MIT License) and available on GitHub. Whether you use it as-is, fork it for your own needs, or just read the code to learn - I hope you find it valuable.
Now, onto the next version...
Project Links:
- GitHub: esp32-wifi-utility
- Documentation: GitHub Wiki
- Latest Release: v5.0.0
- License: MIT
Author: Arunkumar Mourougappane Contact:GitHub Profile
"The best software is written and re-written many times before it becomes great. Don't be afraid to delete code, refactor ruthlessly, and always keep learning."